
Anyone who knows me knows that I don't do anything quick. But content is king, and if I want to compete with all the clickbait out there and keep your attention, I really gotta start pushing out more content. But its gotta be quality content. So, here's my first Quick Shot: part product usage tutorial/tips, part review, part product push for some of my favorite content artists.
We're looking at an older product here, but one that is more versatile (with a little help) than its given credit for being (well, actually I'm not sure I have ever seen anyone give it any credit): OOT Male Iray Lights.
You probably know outoftouch (Daz Store, Renderosity Store), he's been a vendor for a long time and he's been making great textures (I'm going to have something to say about his PBR textures one of these days), clothing, hair, etc. He also, obviously, has released a few light sets. His lights can be a little hit or miss, but with this one he knocked it out of the park.
Do I need to say that these lights are for the Iray render engine? I mean, its right there in the name...
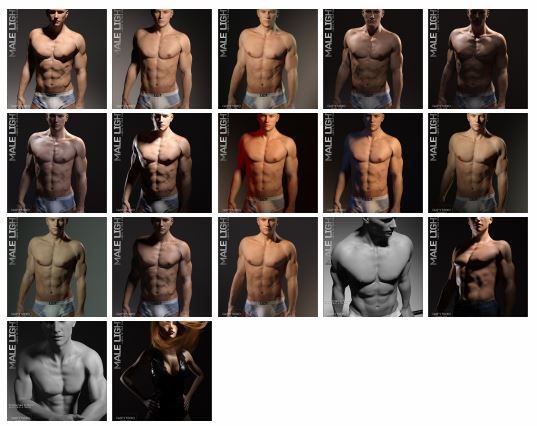
Thirteen light presets (you can find them in Smart Content under Products > Lights > Iray) made up of 1, 2, or 3 spotlights. They are all pretty dramatic and with an artist's eye for color. When using these lights, you want to set your Environment Mode to Scene only, or be very careful with your Environment or you are likely to overpower the effect that these lights give.
Ok, so there is a little problem with these lights: they are aimed at figure loaded into the center of the scene.
But wait, I thought you said these lights were versatile?
Well, they are, but you need to help them a little bit.
Here's a very simple tip to make these lights go from "cool" to "amazing" in just two quick steps. Its going to take a little bit to explain, so bear with me.

Create a Null, from the Create Menu (See Fig 1).
Wait, what the hell is a Null Object? A Null is like a placeholder, or an all purpose handle. It has no geometry, no materials and no textures and it will not render in your scene. But you can do all kinds of neat things with Nulls. Like what we are going to do.
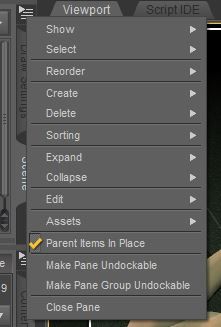
First you want to make sure that Parent In Place is turned on from the Scene fly out menu (See Fig 2). If Parent in Place is not checked, you are going to want to select it, its kind of vital for this to work.
Next, load the light set you want to work with. You'll get one or more lights with names like: main, rim right, rim left or back.
Now, you need to either:
- Select each of the lights indivually, and right clicking on them, select Change Parent and set it to the Null
- or select all of the lights and drag them on top of the Null object (I prefer this method)

If you've done this right, you will now have your lights parented to the Null object (see Figure 3). If thelights go all wonky and end up flying to the middle of your scene, you did not verify that Parent in Place was checked.
Great. So I have lights parented to a Null. How does that make the lights more versatile? You said this was going to be, and I quote: "awesome".
Well, now that you have the lights parented to the Null, you can move the Null anywhere in the scene, even rotate it, and maintain the lightset's original orientation!
Then, with just a minor Y rotation, you can go from this:

To this:

You just made the lights portable and quickly adjustable, so that pose you like that has your figure off to the left of center and turned half way away from the camera -- no longer a problem, because you nudge the lightset over and turn the whole rig around the center point to get just the angle you want! (Use the Universal Tool, or the Null's Parameters Tab for this.)
Of course you can use this little tip with any lightset that does not feature a Null object already. You can also still manipulate the individual lights themselves: change their shapes or colors, even adjust their position and angle to get exactly what you want.
Items used in this tutorial: