
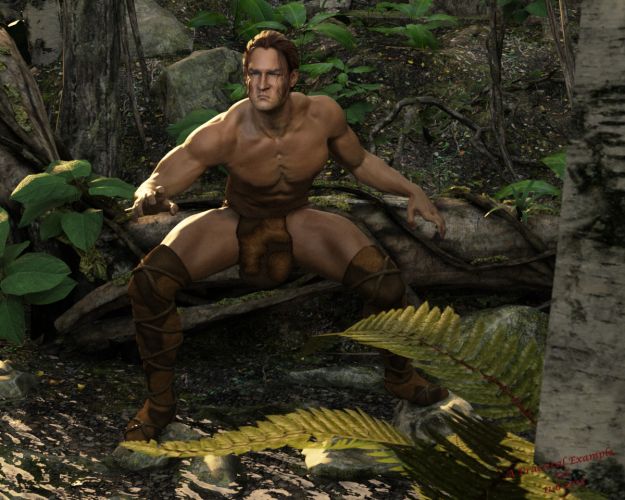
 When we left off, I had just put in a spotlight to give our main figure some definition and overall better illumination. I'm pretty happy at this point; I've got my light illuminating the scene (and it looks pretty good on the water of the stream) and its doing a nice job highlighting my figure and making him stand out from the background. The fill light I added shows off his physique to nice affect and illuminates some of the detail on his clothing.
 It was actually at this point that I started to add in the clothing and the hair (I had originally wanted to use Tristan for the hair, but I wasn't quickly getting the materials to look the way I wanted, so I went with Ancient Combat instead), and I did spend quite a bit of time working with the water. I tweaked his pose a little more and found an expression that worked for me.
I waited until this point to do all these things because its much easier to fill in the details when you have the broad strokes down and your lighting pretty well completed. And it makes any mistakes in posing or clothing poke-through, etc easier to find.
There's a last, really important detail, however: his face is flat and lifeless, particularly the eyes.
There's a few things wrong with the eyes. First of all, they are staring straight ahead; this is a common mistake, as the eyes are rarely posed with any pose or expression preset, and if you do not make any sort of adjustment, they are always going to look slightly off. So I start there, using 100 Essential Expressions for M6, I choose one of the 20 eyes only presets, and give Gianni's eyes a subtle shift towards the camera.
If the eyes were a bigger part of this shot, I would also work on the size of his iris and change the pupil dilation, but since these elements are barely visible, I left them alone.
I'm sure many of your reading along are already familiar with the problem I have to tackle next: the lack of a highlight in his eyes. All it takes is the slightest glint to add that touch of realism. Part of this is psychology again, we expect it and we notice it, sometimes unconsciously, if its not there.
Getting it right, without being obvious, is tricky. I learned a lot from Painter's Lights about setting up a good light for this, but you also have to take into account where your camera is. Highlights and reflections are always about angles: the angle that a light strikes a surface and its relation to where the camera is.
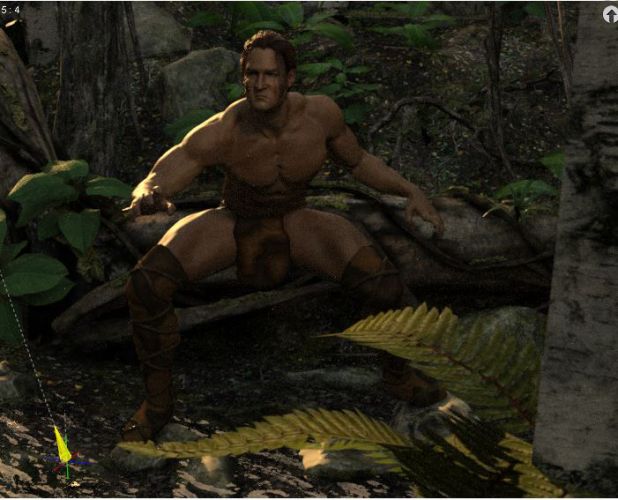
 The image to left shows 3 important things: Gianni, the camera and the spotlight I using to highlight his eyes and face. Notice the angles...the light is not pointing directly at Gianni (and in fact is angled downward a little, which I will show in the picture), and it is angled differently than the camera in relation to Gianni. If you keep these things in mind, you'll find it easier to get the highlights you are looking for.

And here's the view from the spotlight itself, showing the angle down and slightly to the right of Gianni. (image to the right)
 The settings for the spotlight. I've chosen Rectangle again for the geometry, though I suppose in this setting a disc or sphere might have been more appropriate. I've set the size to be pretty small, 20x20, because I do not want this light to be diffuse. I want it to be tight and controlled, because its main goal is to slightly better illuminate the face and give me the highlights I am looking for in the eyes. Since the light is pretty tight in relation to Gianni, but I don't want the light to be obvious, I increase the Spread Angle to 80. For the same reason, I reduce the Lumens from the default 1500 to 1200. After a quick test render, the light is too much, it is obvious on Gianni's face and not blending in with the overall image, so I reduce the Lumens again to 1000 and this gives me exactly what I want.
The higlights are hard to see in the final image unless you view it at the full resolution (you can see that one in my DAZ Gallery), but they are there... and it does have an affect on the viewer.
That covers pretty much everything I wanted to talk about with this image and lighting it. I hope you all enjoyed the ride and maybe learned something along the way.